|
HOW TO BUILD A SIMPLE AND CHEAP DREAMACHINE by Isabelle Aubert-Baudron (1981)
Discoverers : BRION GYSIN and IAN SOMMERVILLE
The plan below is for a 78 rmp dreamachine. See below the drawings of the plan for the explanations for a 45 rpm dreamachine. It's different from Brion's plan as this dreamachine allows to get to different rhythms inside the alpha band (7 to 13 flashes per second)
EQUIPMENT - 1 record player working at the speed of 78 tours/minute, - 1 big cardboard sheet, rigid enough for the future cylinder to stand up, and soft enough to be easily cut and worked; you can get sheets of different thickness and dimensions in an office stationery. Choose the darkest color you can find as the cardboard must be opaque to the light of a 100 watts bulb. 1 graduate rule of 30 or 40 cm long, 1 set square, 1 thin lead pencil, 1 rubber, cardboard glue, 1 cutter, 1 100 watts bulb, 1 lamp socket, 1 male plug, electric lead (5 to 6 meters long), 1 multiplug, 1 tape measure to measure the circumference of the turn table of the record-player, clothes pegs. |
Photo Baud |
||
|
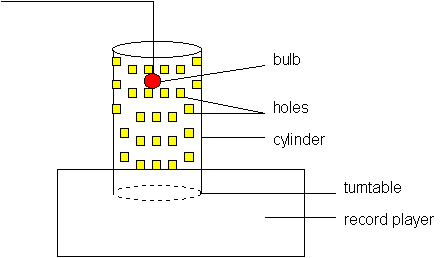
PRINCIPLE OF THE DREAMACHINE To build a dreamachine, you need a cylinder with holes in it, fixed uppon the turntable of a record player turning at the speed of 78 tours/minute. In the middle of the machine, one 100 watts bulb. When you seat in front of the machine, the light of the bulb must come in front of your closed eyes intermittently, according to a rhythm from 7 to 13 light-flashes per second, which is the rhythm of alpha waves of the brain.
For the effects, refer to "Colloque de Tanger", vol. 1, Christian Bourgois éditeur, or "Here to Go - Planer R 101", Brion Gysin - Terry Wilson.
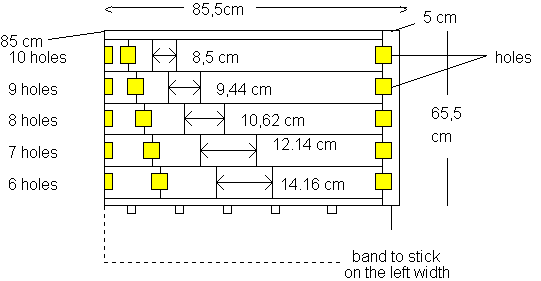
BASIC CALCULUS - The rhythm of the light flashes is from 7 to 13 flashes/second. - The turntable of the record-player turns at the speed of 78 tours/minute = 78 tours/60 seconds. - In one second, the turntable makes : 78/60 = 1,3 tour. - 1 flash corresponds to a hole in the cylinder. - 1 row of 6 holes (6 flashes) will give for every tour a rhythm of 6x1,3 = 7,8 flashes/second - 1 row of 7 holes : 7x1,3 = 9,1 fl/s - 1 " " 8 " : 8x1,3 = 10,4 fl/s - 1 " " 9 " : 9x1,3 = 11,7 fl/s - 1 " " 10 " : 10x1,3 = 13 fl/s The length of the cardboard sheet must be equal to the circumference of the turntable. The dimensions of the plan are the ones of a Dual 1010 record player; the circumference of its turntable is 85,5 cm.
PROCEDURE 1. Measure the circumference of the turntable with the tape measure.
2. Transfer this dimension on the length of the cardboard sheet from the left side at the top and at the bottom of the sheet. Draw a line joining the 2 points, parallel to the width of the sheet.
3. Once the line is drawn, draw another one, parallel to the first one, 4,5 cm on the right far from it; this is to delimit a little band which, at the end of the operations, will be stuck to the left width to make the cylinder. With the cutter, cut the sheet along the second line. So the final length of the cardboard is : 85,5 cm + 4,5 cm = 90 cm.
4. At the top of the cardboard, on the right and left widths, measure 2,5 cm. Draw a line joining the 2 points. You get a band of 85,5 cm x 2,5 cm. Do the same at he bottom of the cardboard in drawing a band of 3 cm wide (see the drawing). The width between the 2 bands is 65,5 - (2,5+3) = 60 cm.
5. Now divide this width of 60 cm in 5 equal parts of 12 cm. Measure 5 times 12 cm on the right and left widths. Draw the lines joining those new points. You get 4 new lines, parallel to the length.
6. Now calculate the dimensions of the holes in every row. The upper row will contain the most numerous holes (10) and the row of the bottom, the less numerous holes (6), so the base of the cylinder is as solid as possible (see the plan of the cardboard of the cylinder).
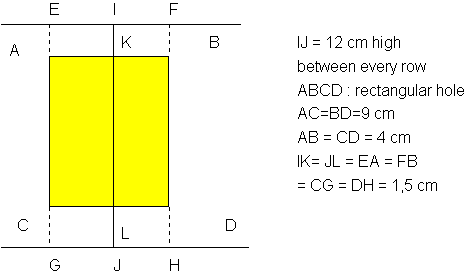
a) Upper row : * Divide this row in 10 equal parts : 85,5/10 = 8,55 cm * Measure 10 times this dimension at the top and at the bottom of the upper row, in beginning by the left. * Draw the lines joining the new points : you get 9 parallel lines 8,55 cm far from one another (these lines will be in the middle of the holes) delimiting 10 rectangles of 12x8,55 cm. * Take the plan of every hole : the line IJ represents the new lines you have just drawn. On this line IJ, measure 2 times 1,5 cm, from I and from J, so you get the points K and L. From these points, perpendicularly to IJ, measure the points A, B, C and D, 2 cm far from K and L. raw the lines joining A and B, B and D, D and C, C and A. The rectangle you get is the hole. * Proceed the same way to get all the holes of the row. On the left width of this row, you only get half a hole. On the right side, at the end of the row, the last hole encroaches upon the band to stick; the second half of this hole will fit to the half hole on the left when you stick the cylinder, and this for every row. In other words, the left half hole and the hole at the right end of the row will make the same hole.
b) Second row : It will contain 9 holes. Proceed as you did for the upper row, but divide the length of the cardboard by 9 : 85,5 / 9 = 9,44 cm. Proceed as before with this new dimension and so for the other rows :
c) Third row : 8 holes : 85,5 / 8 = 10,62 cm
d) Forth row : 7 holes : 85,5 / 7 = 12,14 cm
e) Fifth row : 6 holes : 85,5 / 6 = 14,16 cm Every hole has the same dimensions, whatever the row may be.
7. Once you have delimited all the holes, cut them with the cutter. Put the cut pieces of cardboard aside, you will need them later on.
8. Put the cardboard sheet upon the turntable in giving a cylindrical shape to it. Temporarily fix the 2 widths the one on the other with clothes pegs. Make sure the base of the cylinder fits with the dimensions of the turntable and that the left half holes fit with the holes of the right width. Do not stick the edges yet.
9. If the turntable is covered with a rubber surface, delicately unstick the edges of this surface; you are going to use it to maintain the cylinder in position. If there is no rubber surface, take a thick piece of rigid cardboard and cut it according to the exact dimensions of the turntable. Make a hole in the middle, like a LP record, in introducing it in the axis of the turntable.
10. Go back to the cardboard sheet. Take the cut rectangles ABCD you had previously put aside, and solidly stick them at the bottom of the sheet on the width so you get little tongues to be fold and slipped perpendicularly under the rubber surface, to keep the cylinder upon the turntable. Put as many tongues as needed.
11. Your cylinder is ready. Stick the 2 widths one upon the other, maintaining the stuck band with the clothes pegs, in adapting them in the holes. Leave the pegs until the cardboard and the glue are dry. If the upper row is not perfectly circular, in cases the cardboard would fold over the holes, make the cardboard more solid in sticking the remaining little triangles ABCD inside the cylinder.
12. Then you adapt the cylinder on the turntable in slipping the little tongues under the rubber surface or the cardboard disc. The body of the dreamachine is ready now. If you turn the record player on, the cylinder must turn on the turntable in remaining solidly fixed.
13. Then you take the bulb, the lamp socket, the electric lead and the male plug. Fix the whole lot together.
14. Put the dreamachine on a stool, near a power point, let the bulb hang in the middle of the cylinder without it to touch the edges. Adjust the length of the lead over the dreamachine in the most adapted way to the room where you are (you can pass the lead in a hook screwed in the ceiling, make a bracket system, etc...). The length of the lead must be adjustable, so the bulb can be put in front of every row. 15. Plug the bulb, plug the record player, turn it on in setting it on the 78 tours speed. Sit comfortably in front of the machine and approach your face the closest you can. Close your eyes and watch : you get inside your head multicolored geometric and stereoscopic 360° images, and lights, the colors, shapes and designs of which constantly changes. You can vary the images in increasing or lessening the pressure of your eyelids and the distance between your face and the machine and in experimenting the different rows. A record has been specially made to be listened to while watching the dreamachine, its rhythm is the same as the light flashes: "Heathen Earth", Throbbing Gristle (International Records), best in stereo with a headphone.
PLAN OF THE CARDBOARD FOR THE CYLINDER (The scale is approximative, because of the imprecision of the drawing program. Use the dimensions instead of reproducing the schema, which are here for indications, to allow to visualize the work to be done.) |
|||
|
|
|||
|
|
|||
|
|
|
||
|
|
|||
|
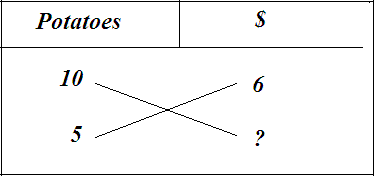
or a 45 rpm dreamachine Just change 78 by 45 on the plan : - rhythm : between 7 and 13 - turntable : 45 tours by minute = 45 tours for 60 seconds. - In one second, the turntable makes : 45 / 60 = 0,75 tour - one raw of 10 wholes (10 flashes) => a rhythm of 10 x 0,75 = 7,5 flashes /second = - 1 raw of 12 holes = 12 x 0,75 = 9 etc... with 14 and 16. Then you measure your turntable, and do just as on the plan, except you make more wholes, using the rule of three : You probably learnt it at school when you were a kid : if 15 kg of potatoes cost 6 $, how much will cost 5 kg? Here is a mnemotechnic to remind it : You write it down on a paper : one columns for the potatoes, one for the $ : Then you make a cross like a X between the two columns
|
|||
|
Potatoes
15
5
|
$
6
? |
|
|
|
multiply the two numbers 5 by 6 and divide the result by the number with the ? : 10 : 5 x 6 = 30 30 : 15 = 2. You do the same for the dreamachine. |
|||
The documents gathered on the dreamachine are in the Interzone anthology: The Time of the Naguals , in the Tome 2: Research: 163 pages and at www.inter-zone.org/dm.html |
|||